A Few Photogrammetry Experiments with Max
While 3D printing bones from CT scans was fun, what I'd really like to do is scan in ordinary objects that I could manipulate and print. Professionals that do this kind of scanning use expensive LiDAR scanners or setup special rooms with calibrated camera arrays. Intel's RealSense L515 camera looked like it would be a promising, lower-cost LiDAR camera, but Intel just announced that they're killing off all the RealSense products (yet another failed intel product line). Apple's phones and tablets with LiDAR sound like what I need, but I just can't force myself to buy anything from Apple (not even that laptop that thieves just ordered with my credit card and shipped to my house by mistake!). That leaves me with plain old photogrammetry from images.
Qlone
Previous experiments with Meshroom left me feeling like I could get some good results, but only if I put a lot of effort into doing the photography right. In hopes of finding something that was more integrated with a phone, I skimmed websites and found some positive reviews of an Android app named Qlone that could scan simple objects using just a phone. The clever part about their approach is that they use a specially formatted mat that you print out to help orient the camera. I downloaded the free version of the app, printed the map, and set off to scan in an old Max Headroom candy container I bought from a gas station back in the eighties (interestingly, someone else has already scanned this in and posted it to thingiverse).
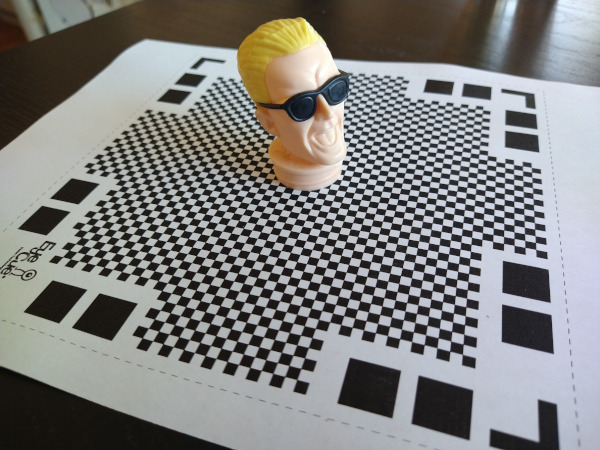
One of the nice things about Qlone's approach is that the mat makes it possible for the camera to figure out its orientation in real time. It renders a dome over your camera view while you're scanning so you can see what angles need to be done. While I initially tried moving the phone around the object to get all the pictures, it was a lot easier to hold the camera at one orientation and then just rotate the mat. Once the app had pictures from all angles, it went through the math to chip out a 3D model. While the model did look like Max Headroom, the quality was pretty low. This might have been because the subject was plastic (photogrammetry has trouble with glossy surfaces), but I'd also suspect its difficult to get good results out of a phone app.

The free version didn't have a way to export the model in a useful way, so the only result I have is this gif. The app baited me with a "buy in the next 20 minutes and get a discount" option. I declined though, figuring anything with a time-limited sale like this probably isn't worth it. While I really liked the user interface for this tool, it didn't produce results that would be good enough for printing.
Back to Meshroom
I decided to hunker down and spend some time experimenting with how to take pictures that would be better for meshroom. People online suggested using a prime lens and constant camera settings, so I impaled Max on a pvc pipe, set him up in my garage, and the did a sweep of pictures using my Canon D77 with a 50mm EF prime lens. I (wrongly!) guessed that I should use a low f-stop (ie, F/1.8) to maximize the blur in the background, hoping that this would make it easier for Meshroom to pick out the foreground. About midway through the pictures I realized that the lighting wasn't very even in the garage and that several of my photos were out of whack due to me having to step around junk sitting around my garage. As I feared, Meshroom was only able to infer about half of Max's head. I moved Max's pipe outside and did another round of pictures in the sunlight.

Meshroom did a much better job reconstructing Max with the second round of pictures. The results are bumpy, but the general shape is there with a decent amount of detail. I was impressed at how well it found the lines in the glasses and the creases in his forehead.

Scan Problems
While the scan looks pretty good visually, you begin to see more of the flaws when you take away the texture map and just look at the durface mesh. If you look at the arms of Max's glasses below, you'll notice that the mesh doesn't know there's a space between the glasses and his face. The texture map adds some color shading to the triangles that makes it look like the glasses are floating and casting a shadow on his skin. Unfortunately, I need the mesh to look good by itself if I want to make a good 3D print.

It's difficult for photogrammetry software to recognize separations like this without a lot of supplemental pictures that aim through the gap. If I wanted to scan Max in the right way, I'd probably pull the Max figure apart and scan each item separately. I'd probably also spray him with something to make the plastic less reflective. This is more work than I want to put into it right now.
Reading through some other web pages, I've realized that I got my camera settings backwards: primes are good for consistency, but the background should not be blurry. A presentation at the Slade School of Fine Art on Photogrammetry recommended an f-stop of F/8.0 as a starting point. Given the number of pictures that Meshroom threw away, I suspect it's useful to have some background detail to help figure out what's going on in the foreground. In any case, these are all good ideas to try out another day.
Files
Here's a copy of the mesh and textures: maxmesh.tar.xz